
The new workbench is coming along nicely. While there is still a lot to do I wanted to make sure I could start using our cross cut table saw as soon as possible. For that to happen I needed to get a few miter slots cut into the out-feed area of the bench-top. This will allow the crosscut sled to transition from the saw itself into the workbench smoothly. How do we accomplish this?
First, I put a 3/4″ wide board down into the slot on the table saw. Then I pushed another board up against it on one side. This second board is long enough to extend into the area I want to route the slot into. Now I can draw a line on the bench-top that accurately reflects the one edge of the slot in the table. I did this for each side of both of the slots that needed to be drawn on the MDF bench-top.
Then I needed to give the router something to follow. I added two guide boards as well as a stop board at the end. Now my path would be straight and easy to duplicate on the second slot. When I started cutting I made each pass twice, lowering the bit slightly so I didn’t try to take off all of that material in one shot.
-
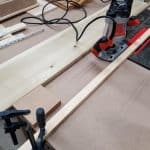
- Straight edge guides to ensure accuracy
-

- The first slot routed and looking good
-
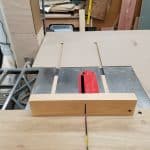
- Lines up nicely.
-
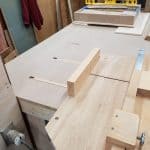
- Very useful
The end result was a smooth transition from the table saw into the workbench for the crosscut sled. In a future post, you’ll see us building a brand new sled with a few more features than the one you see in these photos. I’m thinking I may build something similar to this, created by 3×3 Custom – Tamar.
This video shows a pretty versatile cross-cut sled. However, I don’t feel like some of the features would be something I would benefit from. For instance, in our shop, we wouldn’t need the fence extension to be removable. I may just make ours a little extra long on the left side since we have the space for it. And I don’t think I will at the bevel cutting edge either. But the t-track inserts holding the different angled brackets are pretty interesting. For now, though, the old trusty sled we’ve had for years will continue to live on the new workbench.