
We’ve been hard at work running the new electric for the woodshop. Primarily, we are focusing on the new workbench and the associated lighting. You might ask why a workbench requires so much effort in terms of new electricity. Well, let’s take a moment to look at everything that needs to be included:
The Workbench
The actual workbench will have five accessible receptacles just under the counter height. These will be the ones I reach for when I need to plug in a hand sander or use a heat gun or something like that. They will see a lot of use and I wanted to have plenty available. Do I actually need five? Absolutely not. One on each side would have been fine. But “fine” is not a word I like to use. Why settle for “fine” when with a little extra work you can have “great”? So I installed three on the hallway side of the bench and two on the workshop side.
The Tools
We have a bunch of tools in or around the workbench that are thirsty for electricity. The Craftsman table saw, which we use solely for cross cuts, is built into the new bench. I ran a direct line from the electrical panel to a receptacle inside the workbench specifically for this tool. Technically speaking, I ran a 12/3 wire to a junction box in the bench, then split it into two separate 20amp circuits. That just alleviated pulling yet another wire through the ceiling and down into the project. I hid the receptacle inside the workbench because it isn’t the type of thing you need to be able to access often. Having to open a door to unplug it for maintenance now and then won’t be an issue.
On the far end of the bench, we have three receptacles that are powering additional machines. These tools aren’t physically part of the bench like the Craftsman saw is, but they are very close to it and needed to be powered efficiently. The new Grizzly band saw received a fresh run of 10/2, the 12″ disc sander will be powered by a 110v receptacle that is always on (same circuit as the five workbench receptacles), and the dust collector will be taken care of on its own circuit with a pair of three-way switches so we can turn it on/off from both sides.
The Method
It was extremely important to make sure the wiring was protected and secure. With these as our goals, I used more staples than one might consider necessary as well as drilling 1/2″ holes into the sub-structure to run the wires through. Any work I perform on the top of the workbench should not affect the connections below. You’ll also notice that I have some junction boxes in the workbench that aren’t really necessary. They are there for future additions/changes to make my life a little easier. When the wiring comes down from the ceiling through the support pole surround that we built they go right into a junction box (except the 10/2 for the bandsaw). Then they continue out to the various locations they are needed. In the future, if I decide I don’t like how I wired something in the table or I need to make a change I can do so right there in an easily accessible place. If I had wires run the entire way back to the panel then I would have to be making cuts and splices which isn’t something I’m great at doing.
-
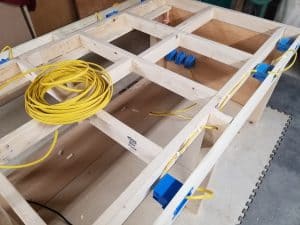
- Overhead view
-
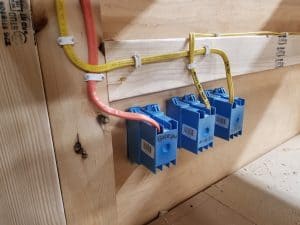
- Three receptacles on the very end. The orange is the 10/2 feeding the bandsaw
-
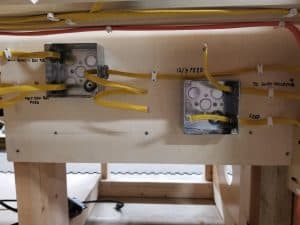
- Junction boxes (with space for another)
-
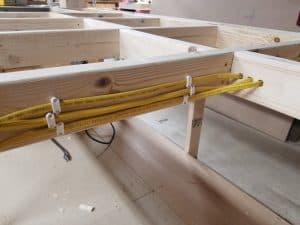
- Making sure the wires stay put